
Astronomer Terraform Provider

If you use Apache Airflow on a regular basis you’ve likely come across Astronomer, which is one of the best ways to deploy and manage Airflow. If you do any platform engineering you likely use Terraform, which is the de-facto tool for managing Infrastructure as Code (we’ll leave the OpenTofu business for another time). The missing link? A Terraform provider for Astronomer!
Wish no more, for here it is: GitHub- Terraform Registry
In this guide, we’ll explore what a typical Astronomer setup may look like today, and how to bring it under management by Terraform using the provider.
TL;DR
If you’re already familiar with Terraform, here’s everything you’ll need to get up and running.
- Organization
data_sourcefor info about your org - Workspace
resourceto manage a (or many) workspaces - Cluster
resourcefor a single-tenant cluster (optional) - Deployment
resource
terraform {
	...
	# other TF config, such as backend, TF versions, etc.
	# Any TF version > 1.0
	...
	required_providers {
		...
		# other providers
		...
		astronomer = {
			source  = "GK-Consulting/astronomer"
			version = "0.3.0"
		}
	}
}

# provider config
provider "astronomer" {
	token           = "<API token>"
	organization_id = "<org ID>"
}

# additional data about the organization
data "astronomer_organization" "org" {
	id = "<org ID>"
}

resource "astronomer_workspace" "my_workspace" {
	name                  = "GK Consulting"
	cicd_enforced_default = false
    description           = "Blog Demo"
}

resource "astronomer_cluster" "aws_dedicated" {
  cloud_provider   = "AWS"
  name             = "Test Dedicated Cluster"
  region           = "us-east-1"
  type             = "DEDICATED"
  vpc_subnet_range = "172.20.0.0/20"
  k8s_tags         = []
  node_pools       = []
  workspace_ids    = [astronomer_workspace.my_workspace.id]
}

resource "astronomer_deployment" "demo_deployment" {
	astro_runtime_version = "9.1.0"
	cluster_id = astronomer_cluster.aws_dedicated.id
	default_task_pod_cpu = "0.5"
	default_task_pod_memory = "1Gi"
	description = "A Standard Deployment"
	executor = "CELERY"
	is_dag_deploy_enabled = true
	is_cicd_enforced = true
	is_high_availability = true
	name = "Test Deployment TF"
	resource_quota_cpu = "160"
	resource_quota_memory = "320Gi"
	scheduler_size = "MEDIUM"
	type = "STANDARD"
	workspace_id = astronomer_workspace.my_workspace.id
	worker_queues = [
		{
			astro_machine : "A5",
			is_default : true,
			max_worker_count : 1,
			min_worker_count : 1,
			name : "default",
			worker_concurrency : 1,
		},
	]
	environment_variables = [
		{
			is_secret : true,
			key : "AWS_ACCESS_SECRET_KEY",
			value : "SECRET_VALUE",
		},
		{
			is_secret : false,
			key : "AWS_ACCESS_KEY_ID",
			value : "NOT_SECRET",
		},
	]
}
Managing your Astro with Terraform
We’ll assume you already have some resources in Astronomer and that you already use Terraform to manage your infrastructure. We’ll use one of our (GK Consulting’s) existing organizations for this demonstration. For the sake of simplicity we’ll create all of our configuration in a single Terraform file, main.tf.
Initial Setup and Org Info
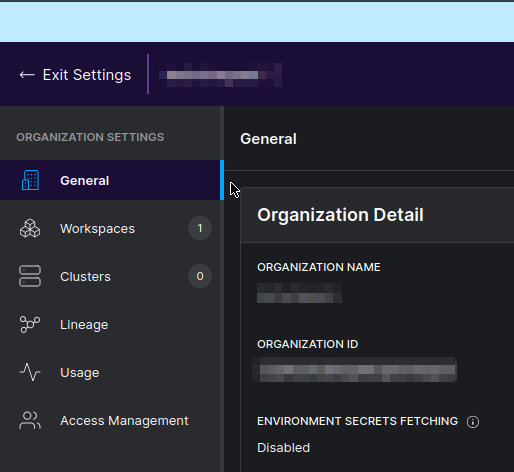
Before writing any Terraform, we’ll need to set up some authentication so the provider can interact with our Astro org. Go to Orgnization Settings -> Access Management -> API Tokens and create a new API token. If you don’t have permissions here, go to Workspace Settings -> Access Management -> API Tokens and create one there. Note this token for use in the configuration below.
Note that this token will be able to read information about the organization, but only perform write operations for this specific workspace. If you want to create or manage other workspaces or org-level resources, you’ll need an org-level API token.
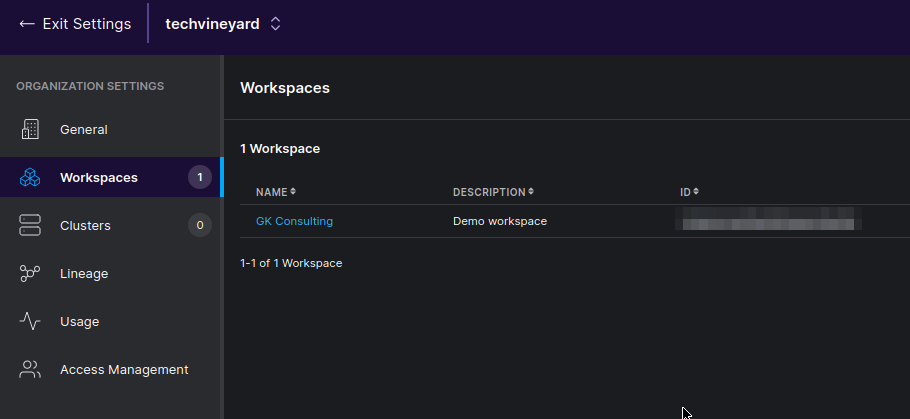
You can see that we have an existing organization with a workspace in it:
Let’s bring these under management with Terraform! First we’ll add an organization data source to make sure everything’s working as well as ensure we’ve got information about our organization to use in the rest of the configuration.
main.tf
terraform {
	...
	# other TF config, such as backend, TF versions, etc.
	# Any TF version > 1.0
	...
	required_providers {
		...
		# other providers
		...
		astronomer = {
			source  = "GK-Consulting/astronomer"
			version = "0.3.0"
		}
	}
}

# provider config
provider "astronomer" {
	token           = "<API token>"
	organization_id = "<org ID>"
}

# additional data about the organization
data "astronomer_organization" "org" {
	id = "<org ID>"
}
First, we’ll run terraform init, which will install the provider:
![image][“20240107144916.png”]
Yes, my terminal is awesome. Manjaro Linux + Starship.rs + Nord Theme = 👍
Now we’ll run terraform plan, which will simply read our org data_source:

Finally, let’s run terraform state list to see that indeed, the information about our organization is in our Terraform state, followed by terraform state show data.astronomer_organization.test to see this information.
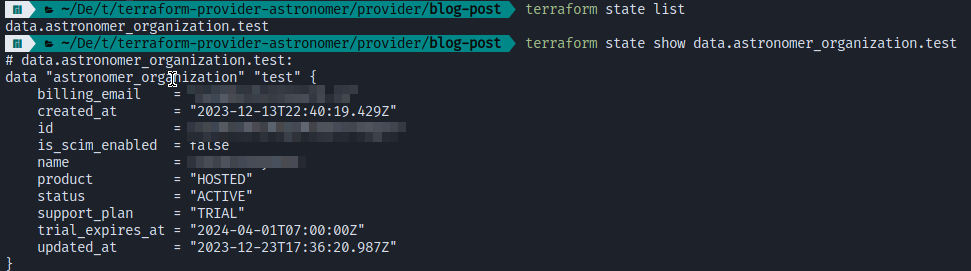 We now have information about our organization available to the rest of our Terraform configuration!
Managing the Workspace
Next we’ll add a workspace resource so that we can manage our Astro workspace.
Remember you can manage multiple workspaces if you’re using an org-level API token, but for this example we’re just managing a single workspace
workspace resource
resource "astronomer_workspace" "my_workspace" {
	name = "My Fancy new Workspace"
}
And our main.tf file in its entirety up to this point:
terraform {
	...
	# other TF config, such as backend, TF versions, etc.
	# Any TF version > 1.0
	...
	required_providers {
		...
		# other providers
		...
		astronomer = {
			source  = "GK-Consulting/astronomer"
			version = "0.3.0"
		}
	}
}

# provider config
provider "astronomer" {
	token           = "<API token>"
	organization_id = "<org ID>"
}

# additional data about the organization
data "astronomer_organization" "org" {
	id = "<org ID>"
}

resource "astronomer_workspace" "my_workspace" {
	name = "My Fancy new Workspace"
}
If you’re creating a net-new workspace you can skip this, otherwise let’s run a terraform import to get our existing workspace imported into this resource. (note you could also use an import block). To run this we’ll need to find the ID of our existing workspace, which you can find under Workspace Settings -> Workspace ID
terraform import astronomer_workspace.my_workspace <workspace ID>

Again, we’ll run terraform state list to see that now our workspace is in our Terraform state.
 Unless you already set all of the attributes in your workspace resource, you’ll likely notice a delta when you run
 terraform plan.
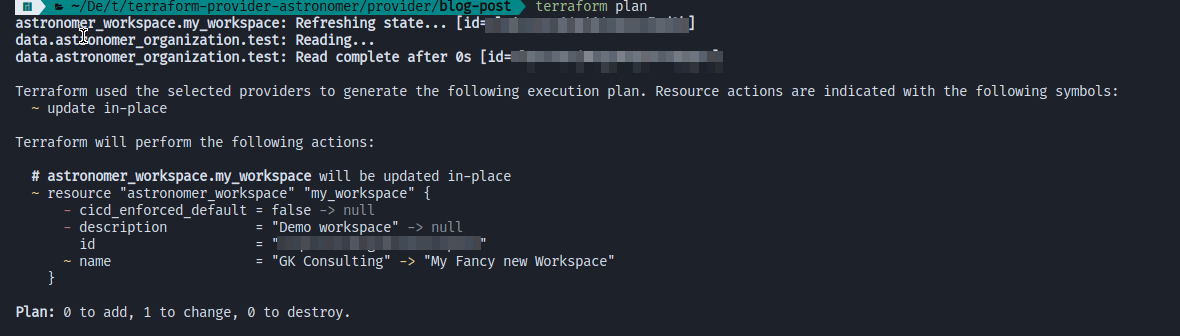 Let’s fix that; we’ll fix the name to match but we’ll let Terraform update the description. Our updated
 main.tf file (using the values for GK Consulting, fill in to match your workspace)
terraform {
	...
	# other TF config, such as backend, TF versions, etc.
	# Any TF version > 1.0
	...
	required_providers {
		...
		# other providers
		...
		astronomer = {
			source  = "GK-Consulting/astronomer"
			version = "0.3.0"
		}
	}
}

# provider config
provider "astronomer" {
	token           = "<API token>"
	organization_id = "<org ID>"
}

# additional data about the organization
data "astronomer_organization" "org" {
	id = "<org ID>"
}

resource "astronomer_workspace" "my_workspace" {
	name                  = "GK Consulting"
	cicd_enforced_default = false
    description           = "Blog Demo"
}
A new terraform plan
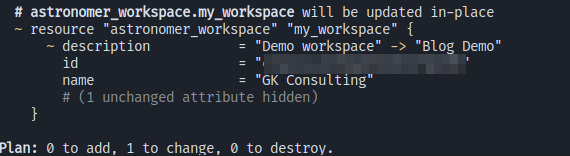 That looks better, we’ll go ahead and run
 terraform apply

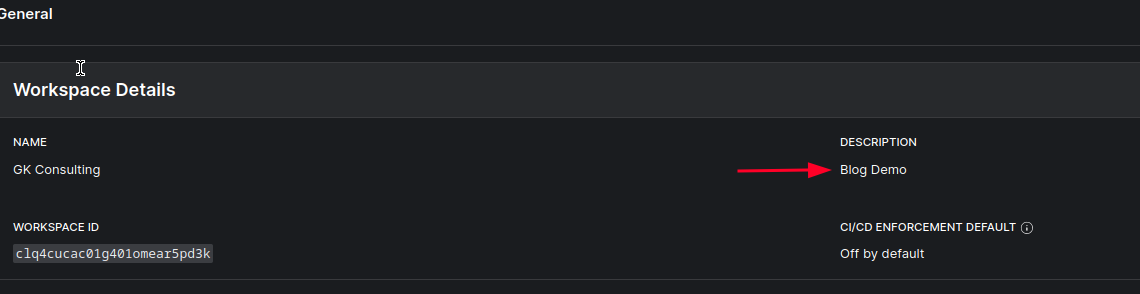
You can see that now our description has been updated to match what we have in Terraform.
Clusters and Deployments
Now that we’ve got some data about our organization and the workspace we’re working in, we can get to the meat and potatoes of using the provider: managing clusters and deployments!
You’ll need an API token with org-level access to create and manage clusters.
If you have any existing clusters or deployments you’d like to manage with Terraform, follow the same process we used to import our workspace.
- Create the basic configuration in Terraform
- Find the
idof the resource terraform import <resource name> <id>- Correct any config
For the rest of this demo we’ll assume you’re creating net-new clusters and/or deployments.
With astronomer you can also create standalone deployments without a dedicated cluster, which will run in Astro’s multi-tenant environment
Cluster
Let’s make a cluster using the cluster resource to run our deployments in a single-tenant environment, we’ll default to AWS here.
cluster resource snippet
resource "astronomer_cluster" "aws_dedicated" {
  cloud_provider   = "AWS"
  name             = "Test Dedicated Cluster"
  region           = "us-east-1"
  type             = "DEDICATED"
  vpc_subnet_range = "172.20.0.0/20"
  k8s_tags         = []
  node_pools       = []
  workspace_ids    = [astronomer_workspace.my_workspace.id]
}
Our updated main.tf file
terraform {
	...
	# other TF config, such as backend, TF versions, etc.
	# Any TF version > 1.0
	...
	required_providers {
		...
		# other providers
		...
		astronomer = {
			source  = "GK-Consulting/astronomer"
			version = "0.3.0"
		}
	}
}

# provider config
provider "astronomer" {
	token           = "<API token>"
	organization_id = "<org ID>"
}

# additional data about the organization
data "astronomer_organization" "org" {
	id = "<org ID>"
}

resource "astronomer_workspace" "my_workspace" {
	name                  = "GK Consulting"
	cicd_enforced_default = false
    description           = "Blog Demo"
}

resource "astronomer_cluster" "aws_dedicated" {
  cloud_provider   = "AWS"
  name             = "Test Dedicated Cluster"
  region           = "us-east-1"
  type             = "DEDICATED"
  vpc_subnet_range = "172.20.0.0/20"
  k8s_tags         = []
  node_pools       = []
  workspace_ids    = [astronomer_workspace.my_workspace.id]
}
Run terraform plan to see the proposed cluster.

We’d recommend not yet creating your cluster, as it can take a long time. Seriously, you’ll probably want to let this one run overnight, so let’s get a deployment configured first (see below) prior to running terraform apply, so they can run at the same time:

According to Astronomer it can take up to an hour to create a cluster, but real life tests seem to indicate it may take longer. We’re working on getting this truly under an hour for v1 of the provider.
Deployment
Probably the most important feature of the provider, we can launch deployments too! Let’s create a deployment using the deployment resource
deployment resource snippet
resource "astronomer_deployment" "demo_deployment" {
	astro_runtime_version = "9.1.0"
	cluster_id = astronomer_cluster.aws_dedicated.id
	default_task_pod_cpu = "0.5"
	default_task_pod_memory = "1Gi"
	description = "A Standard Deployment"
	executor = "CELERY"
	is_dag_deploy_enabled = true
	is_cicd_enforced = true
	is_high_availability = true
	name = "Test Deployment TF"
	resource_quota_cpu = "160"
	resource_quota_memory = "320Gi"
	scheduler_size = "MEDIUM"
	type = "STANDARD"
	workspace_id = astronomer_workspace.my_workspace.id
	worker_queues = [
		{
			astro_machine : "A5",
			is_default : true,
			max_worker_count : 1,
			min_worker_count : 1,
			name : "default",
			worker_concurrency : 1,
		},
	]
	environment_variables = [
		{
			is_secret : true,
			key : "AWS_ACCESS_SECRET_KEY",
			value : "SECRET_VALUE",
		},
		{
			is_secret : false,
			key : "AWS_ACCESS_KEY_ID",
			value : "NOT_SECRET",
		},
	]
}
Our final main.tf
terraform {
	...
	# other TF config, such as backend, TF versions, etc.
	# Any TF version > 1.0
	...
	required_providers {
		...
		# other providers
		...
		astronomer = {
			source  = "GK-Consulting/astronomer"
			version = "0.3.0"
		}
	}
}

# provider config
provider "astronomer" {
	token           = "<API token>"
	organization_id = "<org ID>"
}

# additional data about the organization
data "astronomer_organization" "org" {
	id = "<org ID>"
}

resource "astronomer_workspace" "my_workspace" {
	name                  = "GK Consulting"
	cicd_enforced_default = false
    description           = "Blog Demo"
}

resource "astronomer_cluster" "aws_dedicated" {
  cloud_provider   = "AWS"
  name             = "Test Dedicated Cluster"
  region           = "us-east-1"
  type             = "DEDICATED"
  vpc_subnet_range = "172.20.0.0/20"
  k8s_tags         = []
  node_pools       = []
  workspace_ids    = [astronomer_workspace.my_workspace.id]
}

resource "astronomer_deployment" "demo_deployment" {
	astro_runtime_version = "9.1.0"
	cluster_id = astronomer_cluster.aws_dedicated.id
	default_task_pod_cpu = "0.5"
	default_task_pod_memory = "1Gi"
	description = "A Standard Deployment"
	executor = "CELERY"
	is_dag_deploy_enabled = true
	is_cicd_enforced = true
	is_high_availability = true
	name = "Test Deployment TF"
	resource_quota_cpu = "160"
	resource_quota_memory = "320Gi"
	scheduler_size = "MEDIUM"
	type = "STANDARD"
	workspace_id = astronomer_workspace.my_workspace.id
	worker_queues = [
		{
			astro_machine : "A5",
			is_default : true,
			max_worker_count : 1,
			min_worker_count : 1,
			name : "default",
			worker_concurrency : 1,
		},
	]
	environment_variables = [
		{
			is_secret : true,
			key : "AWS_ACCESS_SECRET_KEY",
			value : "SECRET_VALUE",
		},
		{
			is_secret : false,
			key : "AWS_ACCESS_KEY_ID",
			value : "NOT_SECRET",
		},
	]
}
Note that we’re using the
clusterwe created in the previous step, but you could replacecluster_idwithcloud_providerto run a deployment in a multi-tenant environment.
Let’s run terraform plan to see the deployment that will be created.
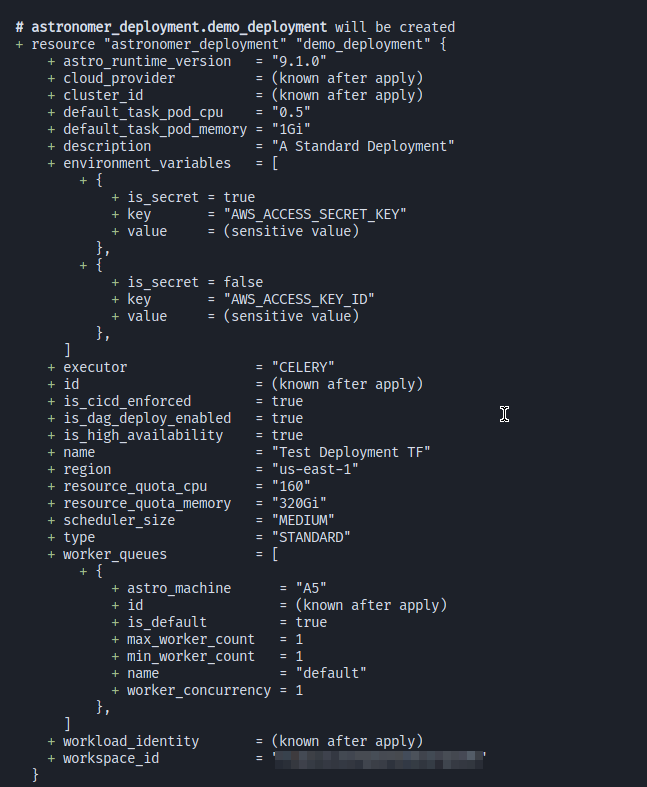
Follow this up with a terraform apply to create your cluster and launch your deployment!
Summary
This has been a brief introduction to managing Astronomer with Terraform. In the process of building this provider, we learned that Astronomer makes life so much simpler when it comes to working with Airflow and we can’t recommend it enough. Coupled with this new ability to manage it all via Terraform, and there’s really no reason to use anything else.
The provider is not yet at v1.0.0 so you may encounter missing features and bugs (such as that massive deploy time on the cluster), but as an open source project PR’s and feedback are welcome!